Showing posts with label Decor/Crafting. Show all posts

Wednesday, May 2, 2012

No-sew pleated lampshade cover

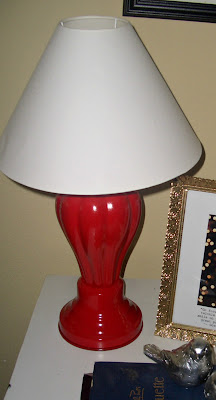
Remember back in the day when I posted this picture and said I wanted get a smaller lamp and replace that big green picture with two smaller ones?


Well it has been done. I found a cute little base that was a hideously outdated gold and tan color but hey, it was 3 bucks. So I took that sucker home and spray painted it a glossy red. Oh yes I did. And its currently my new favorite thing. I looked around for the perfect lampshade to go with it but having been spoiled with a 3 dolla lamp base I wasn't about to go spend 6x that price on the lampshade! So (lightbulb moment) I decided to buy a shade and cover it! Bril. I found a plain ol white IKEA shade at the thrift store for 2 dollas. The sides were bent up a little but it was going to get covered up anyway. At this point I was very happy with life.

Until I realized that there are like NO tutorials on covering a cone-ish shape lampshade. Turns out everyone else is smart and buys a drum shade so its a simple matter of gluing straight across. Not me. I love a good challenge. OK I really just didn't think about it but turns out, its really not that bad

I give you:

Here's the naked lampshade (before it got dressed up):

You can't see it very well in this picture, but there were quite a few dents all the way around it. So I went to Joanns and got 1/2 yard of  fabric. 

First, I folded over the edge and hot glued one long side and the two short sides, leaving one long side raw.
This is how I folded it down and glued it. Simple.

After I got the three sides glued down, I turned my lampshade upside down so the top of the shade was sitting on the table. You will first glue the fabric to the bottom of the shade. So start with the edge pf the shade furthest away from you so you can see what your doing. Hold the fabric to the shade so the fold is towards you. Once you fold your fabric over the shade and glue it down the fabric will look like a finished edge.

Glue away! Slowly working your way around the lamp base...

Once you get the fabric glued all the way around the base flip the lamp back up so the base is on the table. Take the two short sides of the fabric and glue them up the side of the lamp so it looks like this:

Then pull rest of the fabric up tight over the top and cut all the way around leaving about 2 inches of fabric over the top shade rim.

After you get the top trimmed up fold the raw edge down and glue it just like you did the other three sides in the beginning.

Then, starting at the place where you glued the two short sides up the side of the shade, glue the underlapping piece of fabric onto the inside edge of the shade. Then grab another piece of fabric and over lap it slightly onto the piece you just glued down and then glue the new piece down. Continue this all the way around the lamp. (sorry, this part is kind of hard to explain but it makes more sense when you're actually looking at it)

I know this looks long and complicated but its really not. It took me about 45 minutes start to finish and I had no idea what I was doing. But I love how it turned out and it looks so much better.
After you finish all the overlapping and gluing you are done!! Do your happy dance! You now have a lampshade that is screaming (or whispering) your style. That feels good. And you can do the whole thing for a few bucks. You could also add embellishments like flowers, trim, lace, Oooooh the possibilities! If you redo one of yours send me a pic and we'll do a happy dance together! =D

Tuesday, March 6, 2012

1 project down, 29837982374 to go!

We have a six car garage that is packed with my little (and big) projects waiting for a coat of paint, a part, a wipe down, a few screws, you name it. So I am so thrilled to announce that I finally finished one of my projects! Although this project has been sitting in my house and turning the corner where it sat into a dark, sad corner. The dark wood of the side table next to the black marble fireplace was just too gloomy. I needed to brighten it up! And the price was mega right. We inherited this table when we moved into our condo so that was $0...cha ching! Its very a high quality table from Crate and Barrel but it has definitely seen better days. The edges were pretty banged up and there's a nice long scratch down the side. 
So what did I do?? I pulled out my spray paint of course and brightened things up!


First I took off the knob and gave this puppy 2 layers of primer since it had a glossy finish. Then I spray painted it with some Rustoleum (my personal fave) in gloss and I painted the shelf in teal that I mixed up from several different colors I had laying around. Then I used denatured alcohol and 0000 steel wool to antique it. After that I lightly glazed it with some black tinted glaze to bring out some of the cracks and crevices. Finally, I covered it with a coat of polyurethane in semi-gloss. 
The final result has me swooning.  

Leave it to me to leave a bright pink computer case in the picture. dangit.

 It bightened up that corner like you would not believe!! 

 This basket was already being used in here to hold my ridiculous amounts of magazines. I just can't help subscribing to every home decor and health magazine out there when its only $3 for a year! (Black Friday deals my friends;)
 Did you want all the details??
I love the dramatic effect of the dark wood showing around the corners and accenting lines.
 I stole this pair of birds from my bro's wedding reception and they have since lived all over my house. They complete this vignette perfectly =)


`
Hurrah for checking projects off the list and loving the final product! Next on my list to do with that area, find a different lamp- something a little shorter and maybe round and shiny and black :) and then take down the current picture and replace it with two square colorful pictures. Too bad you can't do everything in one day right??

Anyone else finish some fun/necessary projects over the weekend??

Tuesday, February 21, 2012

DIY Laundry Soap


Hows that for a creative title?? I know...I'm just awesome like that.
So my smarty-pants sister called me up the other day and told me about this fantastic laundry soap she made. It smells soooo good and works like a charm for less than 5 cents a load i was told. Um...hello?! I need this in my life!! And then, like awesome things usually do, DIY laundry soap started popping up all over pinterest, in girl chats, in my dreams, on TV, ...ok not really on TV but just about everywhere else. I decided to give it a try. And surprisingly I didn't feel at all like a pioneer or one of the characters on Little House On the Prairie like I thought I would...instead I felt sexy, modern, and incredibly smart. Ha. Try this stuff...its super easy, fast, and cheap. Oh, and it smells just as awesome as it works. WIN.

Here's how this amazingness is done. You need these 3 things- all of which can be found right next to each other in your regular ol grocery store. I bought mine at Winco. Total it equaled out to be about 6 bucks and you only use a little of the Borax and baking soda...so this will make like a lifetime worth of laundry soap. For around 6 bucks. Pinch yourself...this is real.

I hate fuzzy pictures too...here's to crappy cameras. I am open to camera fund donations...

 Freeze the bar of Fels-Naptha for a few hours so its nice and hard...this will make it much easier to work with. 
PS. This is so not my freezer...I borrowed it from a friend so ya'll wouldn't be jealous that your freezer isn't nice and organized and clean like mine...or something like that...

 Smash your frozen bar of Fels-naptha so it blends easier. If you have a super blender this step is unnecessary.


Turn the fels-naptha into powder. This stuff smells like a cotton field on a sunny day and who doesn't want to smell like that??

Measure 1 cup of Borax {notice the awesome things its going to do to your clothes!}

Measure 1 cup of Arm and Hammer Super Washing Soda (not to be confused with baking soda! ;)

 Mix the 3 ingredients together and, that's right, your done. And its been like 3 minutes since you started making soap and you didn't break a sweat. Amazing right?!

And not to be shallow or anything, but doesn't my new little soap holder look so much better than that monster tub of laundry detergent?? Love space savers!

And the best part (besides it being easy, cheap, and affordable)? it only takes 1 tablespoon per load. 2 tablespoons if your kids pooped through 3 layers of clothes or your husband slid into home base to impress you. This stuff goes a long ways.

 So go put these 3 ingredients on your shopping list and make some!! You'll never go back to Tide. Or maybe you will...but I am seriously satisfied with mine. 

K. Peace out girl scouts.

Saturday, November 12, 2011

Its beginning to look a lot like Christmas


I'm one of those people who start craving Christmas music in August. Before I see the pumpkins appear in stores I'm looking around for Christmas lights. Christmas means we are going to see family. It means Kiel will be off school and work. It means family time, singing around the piano, lots of sparkles, three 15 passenger vans full of my family caroling to all 96 people we know, cheerful shoppers, and possibly the best part of it all, Christmas candy. Lots and lots of it. So as far as I'm concerned, skip halloween all together, enjoy a little thanksgiving pie and then party like its Christmas the rest of the year. Yup. I released all inhibition and started playing Christmas pandora a month ago. I embrace you Christmas.
We picked up our new-to-us (i heart you craigslist!) christmas tree yesterday and that sucker is going up today. In the past we have always had a 2 feet tree that was the perfect size for our Wymount apartment and one package of mini ornaments and half a garland made that tree look a little crowded. So this year I'm going to make this 7 foot tree mine. White a red and sparkly. Glitter pine cones tied with sheer and white ribbons. And a monster bow on top. I'm making it all. OK not all but I plan on being ambitious. So with the help of Pinterest I've been collecting ideas. I also wanted to share this website with ya'll. Its fantastic. 101 christmas ornament ideas...it really helps the imagination to bubble over.

 As I get to creating whats in my head I'll try to chronicle them on here. I sure love to see and steal all your good ideas! All you crafty brilliant people you.

Tuesday, October 18, 2011

Yo hot bags!


Setting: Winter distinguished the sun, dropping our home temp to 50 degrees.
Kiel: I'm freezing. My toes are numb.
Me: Mine too. My joints are frozen and I can't move. 
This is where I had a light bulb moment as a distant memory popped into my head. My mom made us some heating bags when I was little and I would use mine all the time
I would heat mine up and hold it on my lap with my hands under it and stay so nice and toasty warm during the Idaho winters. At night I would warm it up and put it at the bottom of my bed over my feet. Mmm. Cozy.
This is basically the solution to all my problems. And they're stinking easy to make. It seriously took me about 30 minutes to make two of them. And they.are.wonderful! Also they are cheap and very useful. In other words, these would make a GREAT Christmas present. Just sayin.

Here's how its done:

1. Cut out two squares of fabric. This will be your bag.
 B. Place the fabric so the printed sides are facing each other.
C. Sew around your square leaving a 3 inch opening so you can pour in your filling. Be sure to backstitch at the beginning and end so your bag is nice and strong! 
 D. Trim the corners. This makes it so your corners are poiky. Like sharpish. You know what I mean. 
 E. Using your small opening, pull your bag inside out so the print is now on the outside.
 F. Make the corners sharp lookin. Pencils are great for this.
  You will want a funnel for filling the bag. If you don't already have one, Trader Joe ads work great. Just tape it in a cone shape.
 G. Now fill er up! I had my side-kick help me with this part. He had so much fun! Yeah, it made a little mess but his huge smile and careful shakey hands were worth it.


 Parks Man didn't help at all. He just sat there and watched. And then pulled everything out of the cupboards and tried to throw it in the bag too. 
  Fill the bag a little more than half full. You don't want it over stuffed!
 At this point I broke out my essential oils. Lavender calms and relaxes so now every time I heat up my bag I also infuse peace into my home. Love!
 H. I sprinkled a few drops of oil into my bag.
 I. Fold over the sides in the opening.
J. Yup. Pinch together. 
 K. Sew that holla sucka up!
 L. Nuke for 3-5 minutes and warm up those frosty fingers and toes!

Fabric: 
You can use anything COTTON. I used some of that snuggle flannel fabric from Joanns. 

Filling options: 
Rice -not instant!- I used brown rice because that's what I had on hand
oats
wheat
feed corn
beans
flax seed
barley

Hot bag purposes:
 heat and place on aches and pains for a soothing effect
place on tummy to relieve menstrual cramps
place on hands or toes to warm em up!
place at the bottom so its toasty warm when you get in

As you can see these things are totally awesome! And you totally don't know how you've lived so long without one. Well you've been freezing and aching. That's how. But now you don't have to anymore cuz you can totally make your own in no time! =0) 

Wednesday, October 12, 2011

elimen-oh! peas!!

This little monkey is sooo grown up now. I know because he started school. Now he's a student just like his daddy. This makes the monkey very happy!


The Never Bored book {um, the most awesome activity book ever...in case you were wondering} came from costco and the other two books came from the dollar store. The foot is courtesy of Caleb.
The craft and learning supplies and all the containers came from the dollar store as well. Crayons, pompoms (awesome for so many things!! sort by color, number, or make crafts with them!), googly eyes, fabric paint, buttons, glitter glue.

All these learning tools fit right inside a plastic tote that I got at the dollar store.


With the start of school, I have had to get things a little more organized. Or rather, Caleb is now more organized. Here is what his new schedule looks like:

Yeah. We like music. For music time we sing all the songs Caleb knows. That's Caleb's favorite. For dance time we blast up pandora Disney and dance like there's no tomorrow. That is my favorite. Join us anytime.
For "explore your world" we usually go outside- weather permitting- and look for bugs, or certain plants, or colors, or we count things. Ya know, whatever.
And every Wednesday we go to story time at the library and then get a bag of books to bring home.
Basically, it adds positive, educational structure to our days and we all love it! No I don't stick to it like glue. I'm way too lazy spontaneous for that but it gives us something to work at, especially when a day is getting particularly wild or boring. 


Is this teacher not the luckiest in the world?!