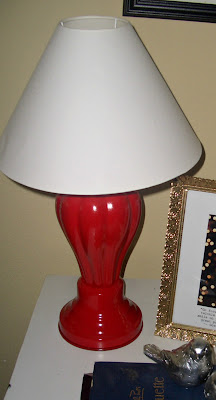
Remember back in the day when I posted this picture and said I wanted get a smaller lamp and replace that big green picture with two smaller ones?
Well it has been done. I found a cute little base that was a hideously outdated gold and tan color but hey, it was 3 bucks. So I took that sucker home and spray painted it a glossy red. Oh yes I did. And its currently my new favorite thing. I looked around for the perfect lampshade to go with it but having been spoiled with a 3 dolla lamp base I wasn't about to go spend 6x that price on the lampshade! So (lightbulb moment) I decided to buy a shade and cover it! Bril. I found a plain ol white IKEA shade at the thrift store for 2 dollas. The sides were bent up a little but it was going to get covered up anyway. At this point I was very happy with life.
Until I realized that there are like NO tutorials on covering a cone-ish shape lampshade. Turns out everyone else is smart and buys a drum shade so its a simple matter of gluing straight across. Not me. I love a good challenge. OK I really just didn't think about it but turns out, its really not that bad!
I give you:
Here's the naked lampshade (before it got dressed up):
You can't see it very well in this picture, but there were quite a few dents all the way around it. So I went to Joanns and got 1/2 yard of fabric.
First, I folded over the edge and hot glued one long side and the two short sides, leaving one long side raw.
This is how I folded it down and glued it. Simple.
After I got the three sides glued down, I turned my lampshade upside down so the top of the shade was sitting on the table. You will first glue the fabric to the bottom of the shade. So start with the edge pf the shade furthest away from you so you can see what your doing. Hold the fabric to the shade so the fold is towards you. Once you fold your fabric over the shade and glue it down the fabric will look like a finished edge.
Glue away! Slowly working your way around the lamp base...
Once you get the fabric glued all the way around the base flip the lamp back up so the base is on the table. Take the two short sides of the fabric and glue them up the side of the lamp so it looks like this:
Then pull rest of the fabric up tight over the top and cut all the way around leaving about 2 inches of fabric over the top shade rim.
After you get the top trimmed up fold the raw edge down and glue it just like you did the other three sides in the beginning.
Then, starting at the place where you glued the two short sides up the side of the shade, glue the underlapping piece of fabric onto the inside edge of the shade. Then grab another piece of fabric and over lap it slightly onto the piece you just glued down and then glue the new piece down. Continue this all the way around the lamp. (sorry, this part is kind of hard to explain but it makes more sense when you're actually looking at it)
I know this looks long and complicated but its really not. It took me about 45 minutes start to finish and I had no idea what I was doing. But I love how it turned out and it looks so much better.
After you finish all the overlapping and gluing you are done!! Do your happy dance! You now have a lampshade that is screaming (or whispering) your style. That feels good. And you can do the whole thing for a few bucks. You could also add embellishments like flowers, trim, lace, Oooooh the possibilities! If you redo one of yours send me a pic and we'll do a happy dance together! =D


2 comments:
Absolutely love it!!! Way to go!!
looks great! I love the pop of red too. Yay for anything that is quick and doesn't involve sewing:)
Post a Comment